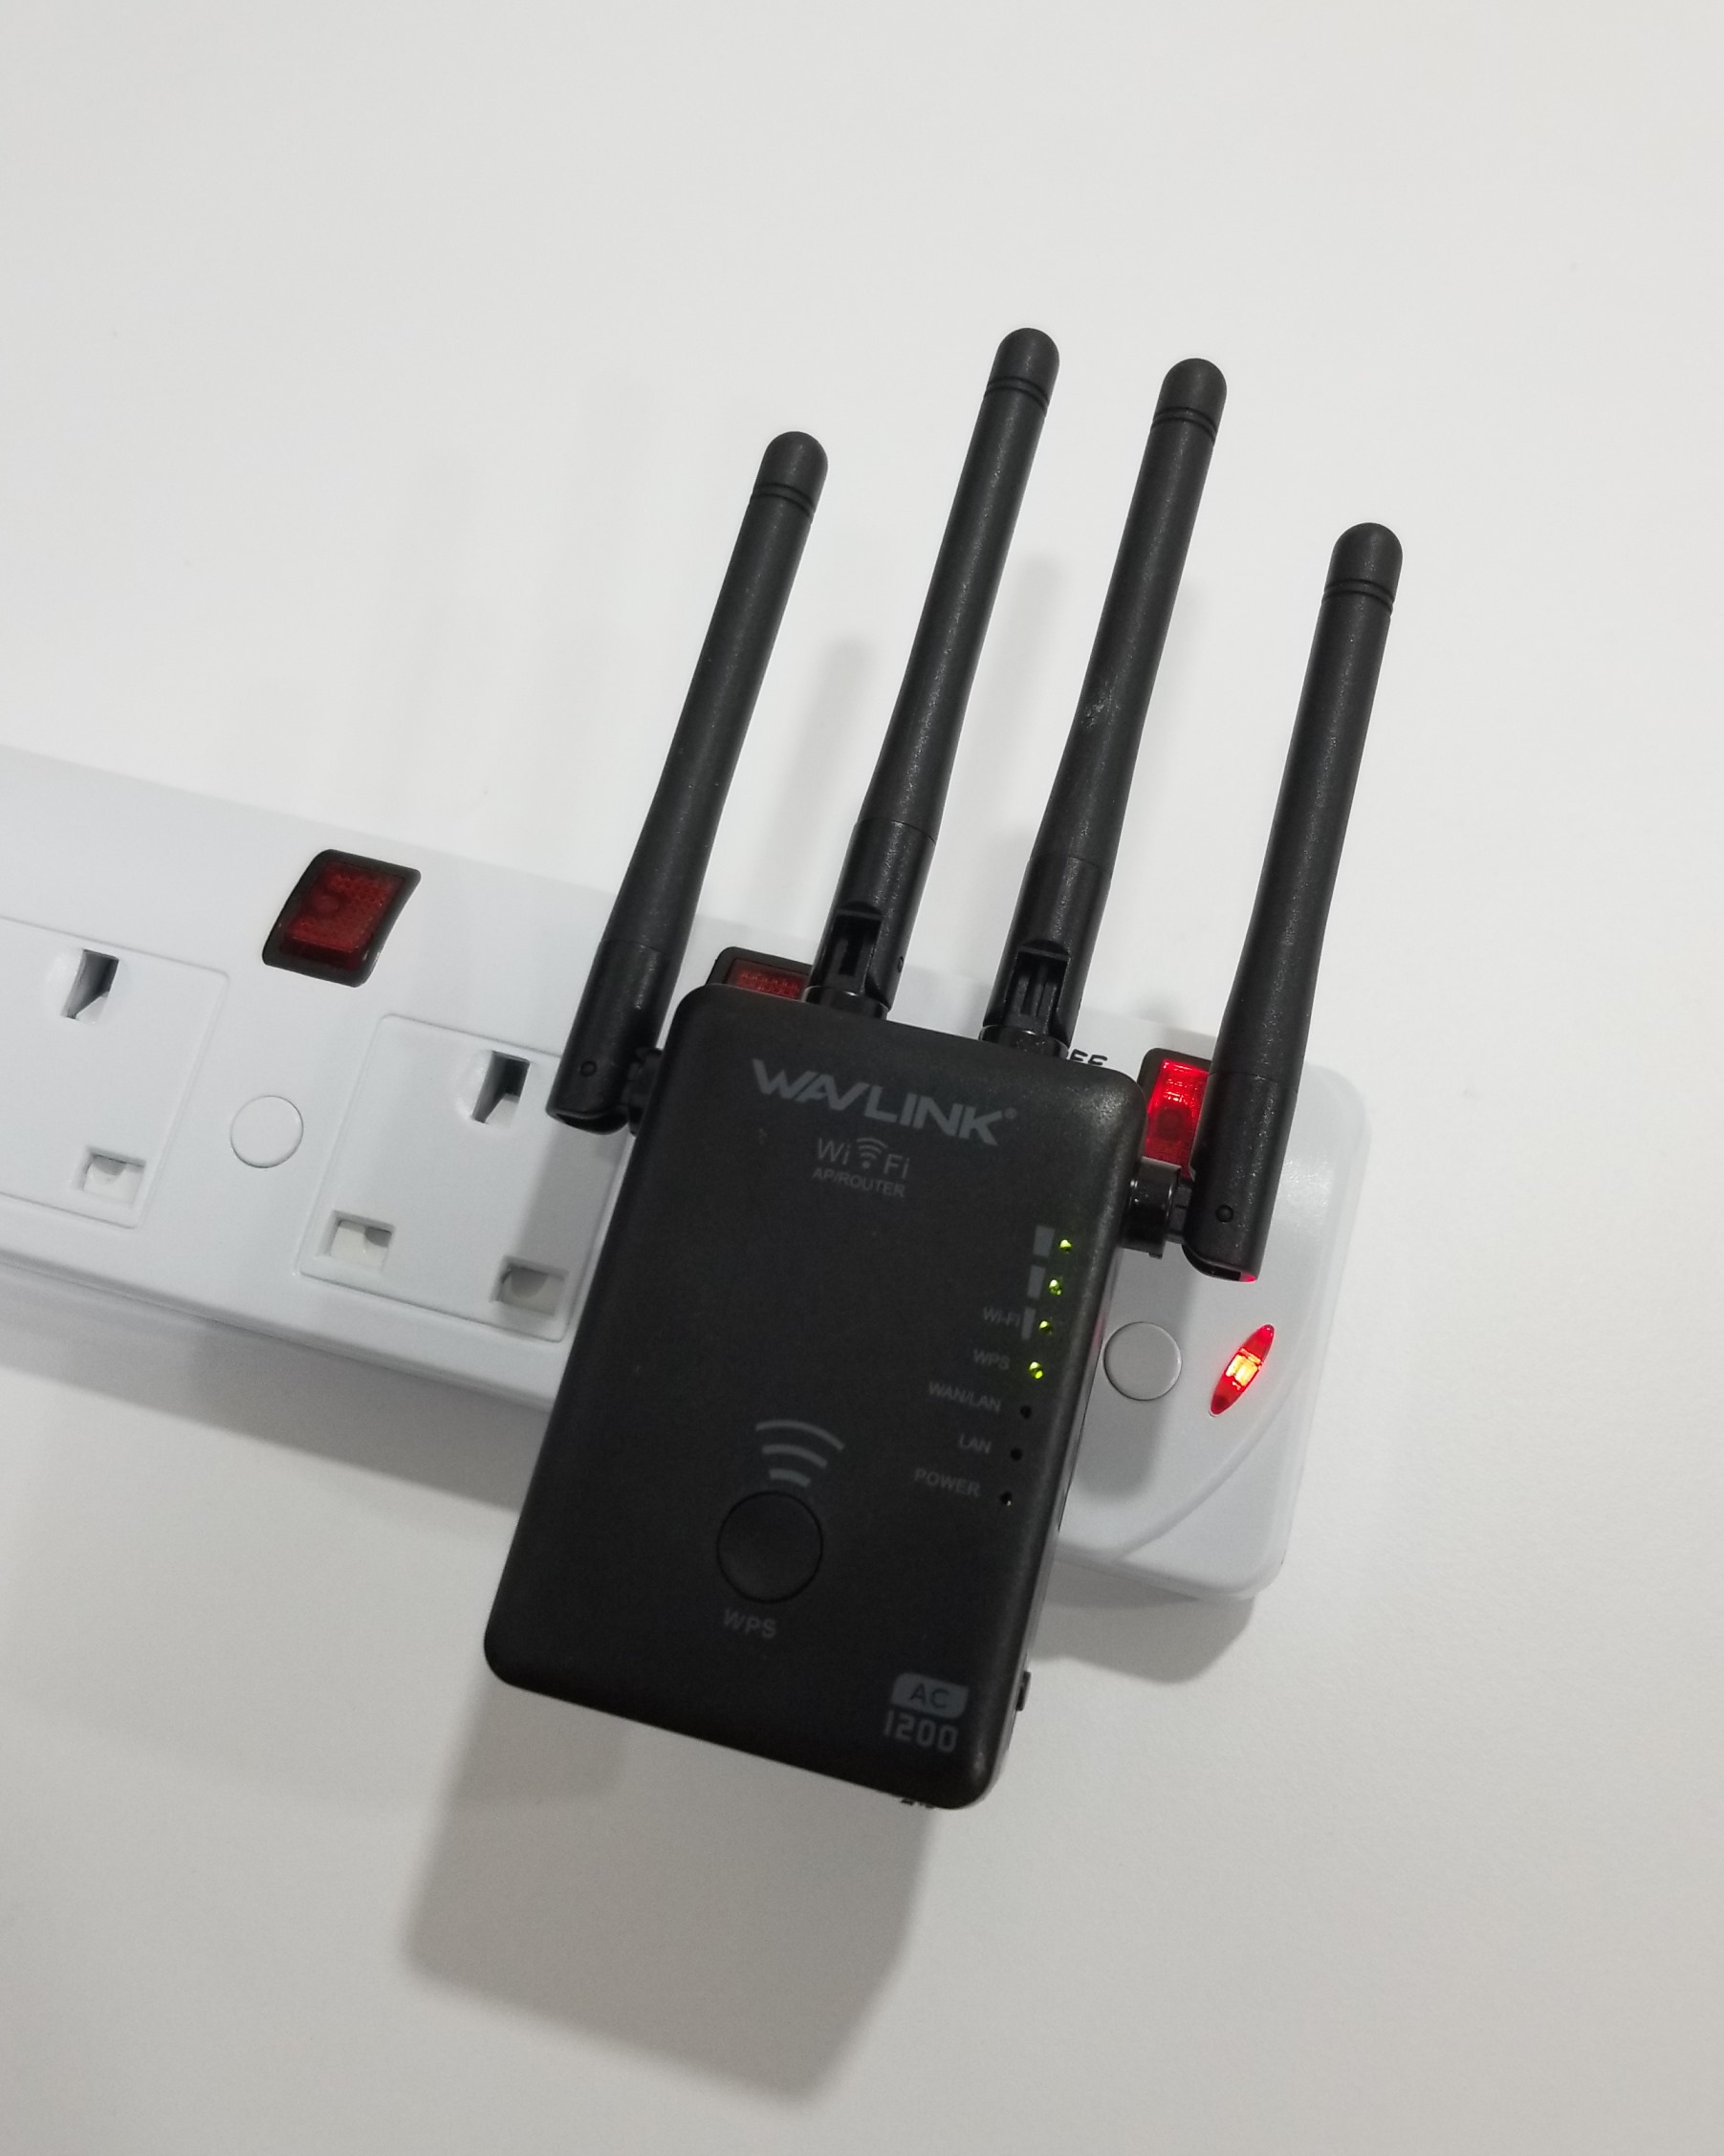
OpenWrt is a great project that provides highly-configurable firmwares that can be flashed onto many wireless networking devices almost independent of its original manufacturer. I use OpenWrt for its customisability and full control in designing the home wireless network architecture. Normally, it is easy to replace the OEM firmware with OpenWrt, but not so for this Wavlink repeater.
This Wavlink repeater was chucked aside a few years ago after its wireless strength was found to be weaker than another TP-Link repeater I was testing. But now, this could find some use as a repeater (with 802.11r fast transition available in OpenWrt) again in my upcoming wireless architecture.
My attempts to tinker with the equipment through SSH or telnet (found by others to be opened at port 23) was initially foiled since the device appears to have been “secured” against such access. Also, the TFTP instruction on OpenWrt don’t seem to work, so probably my device is one that also comes with a restricted bootloader.
Time to try stronger tools then.
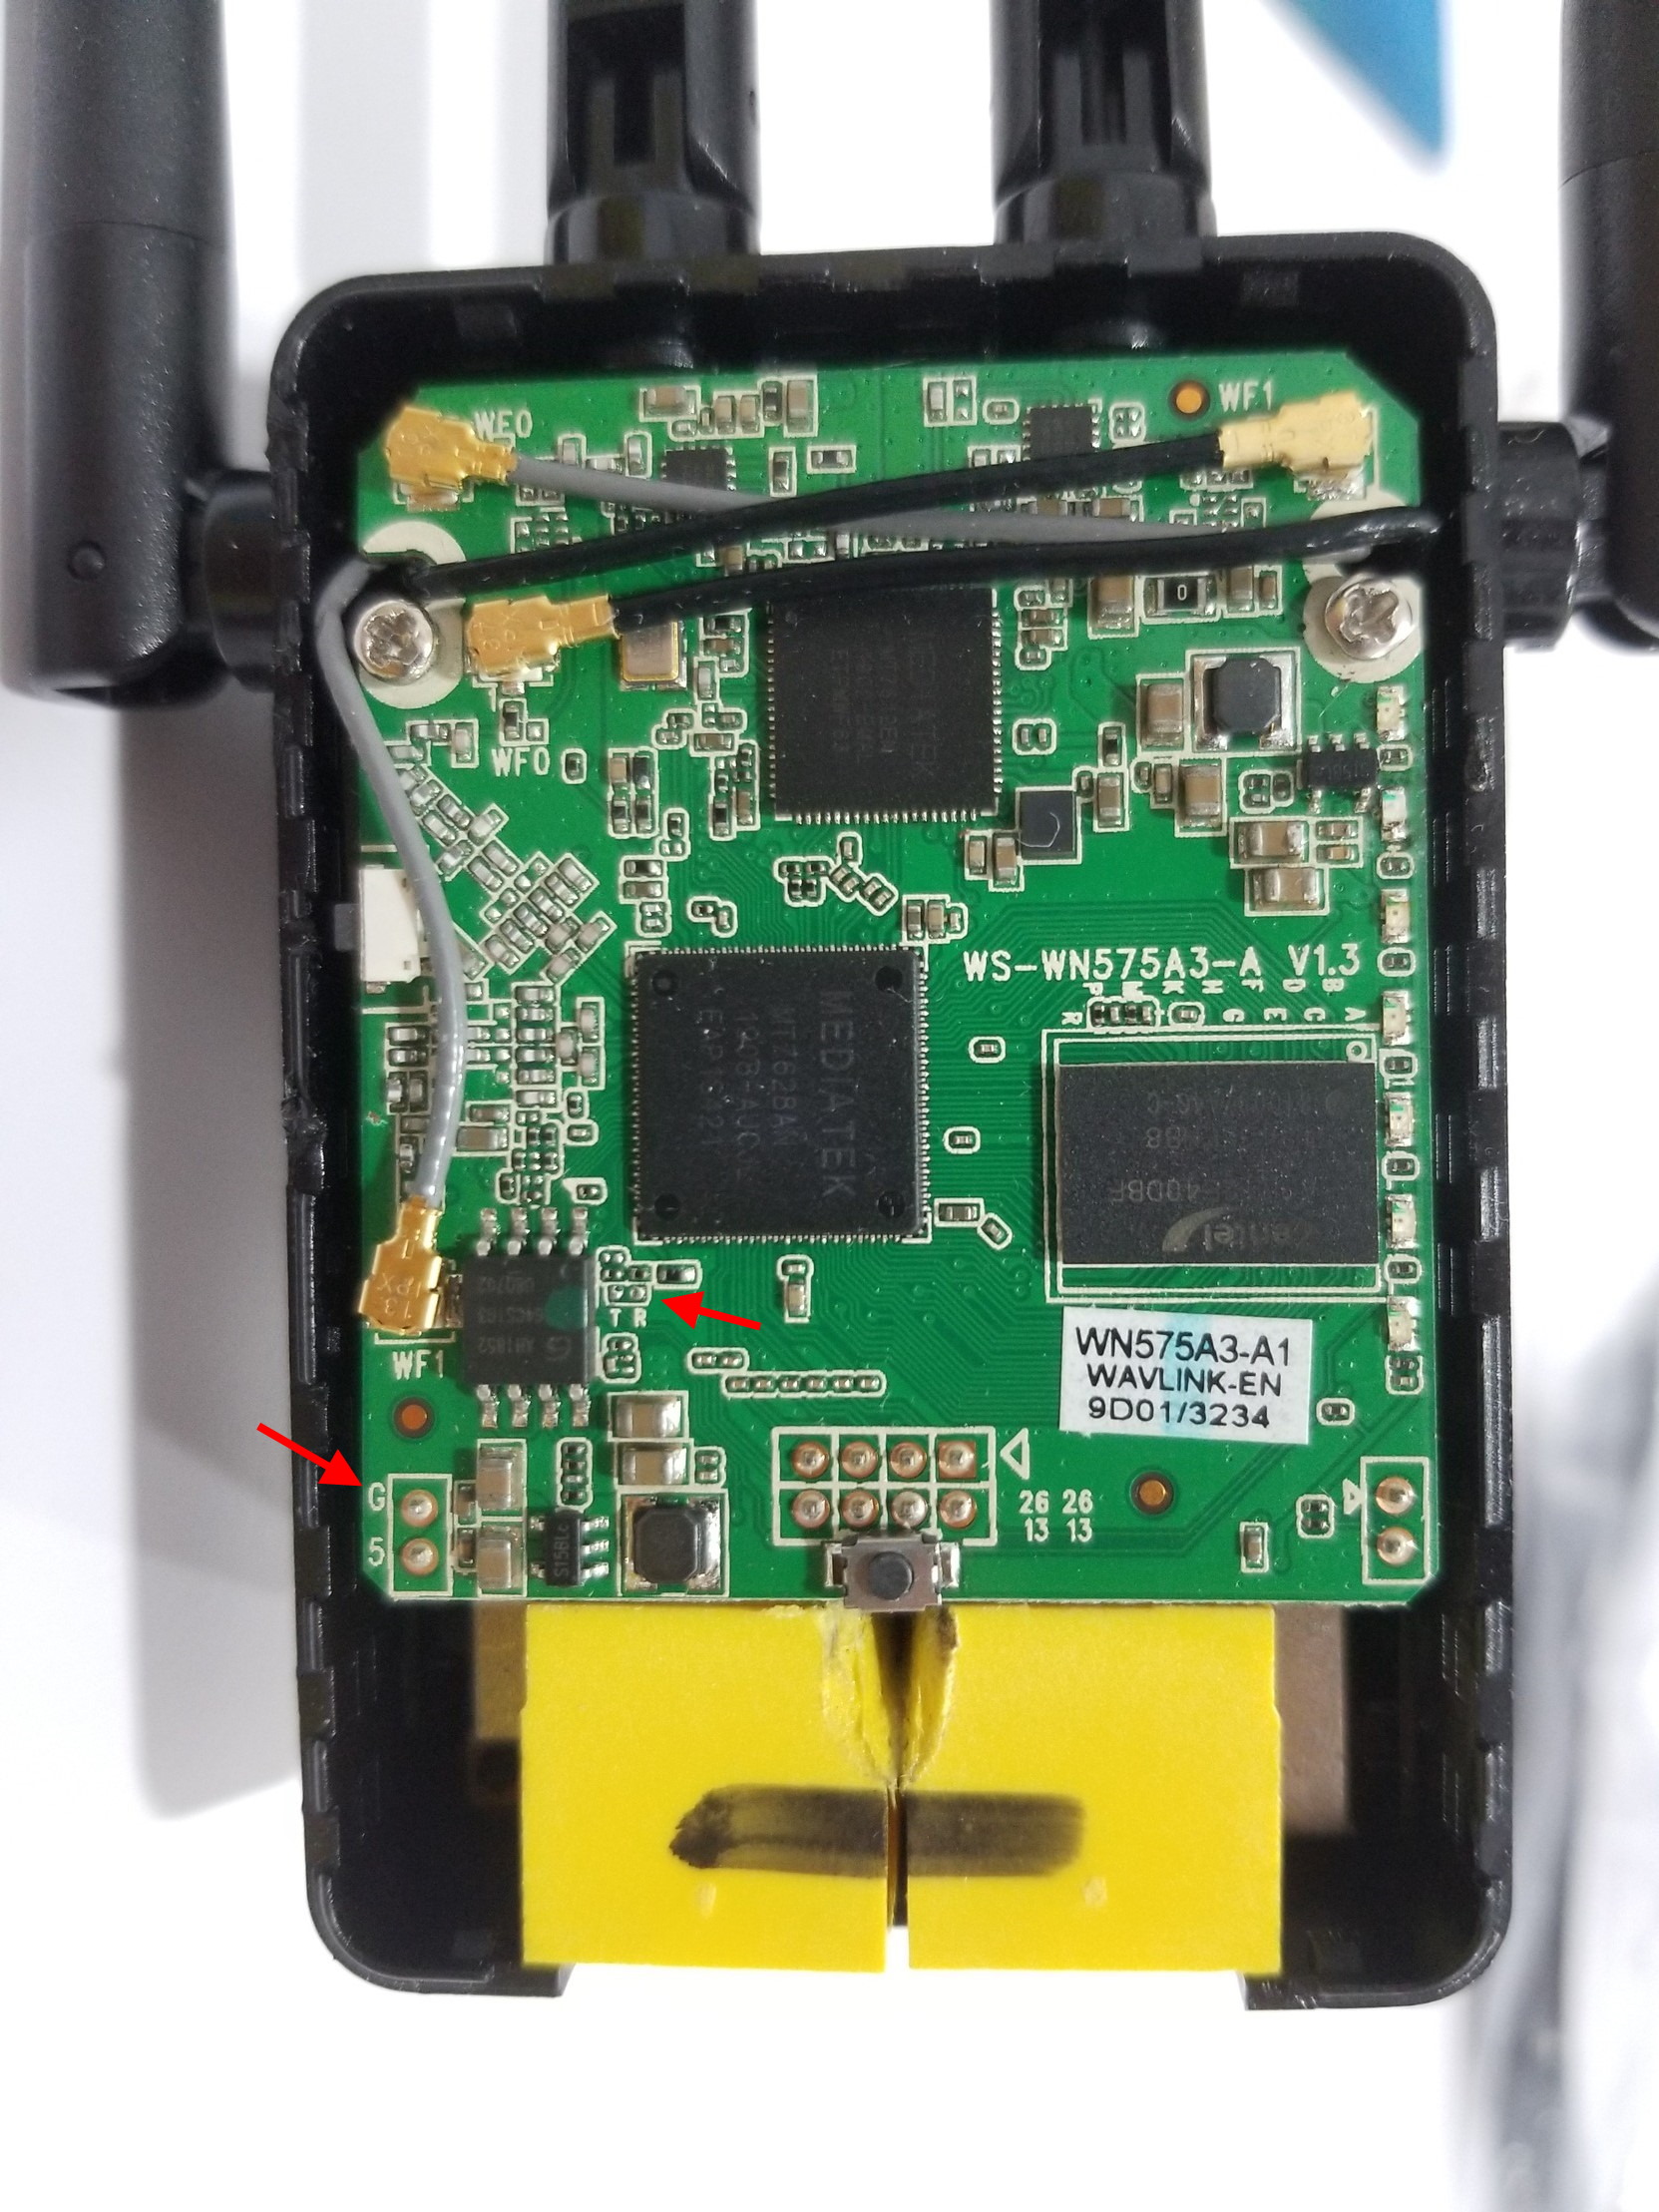
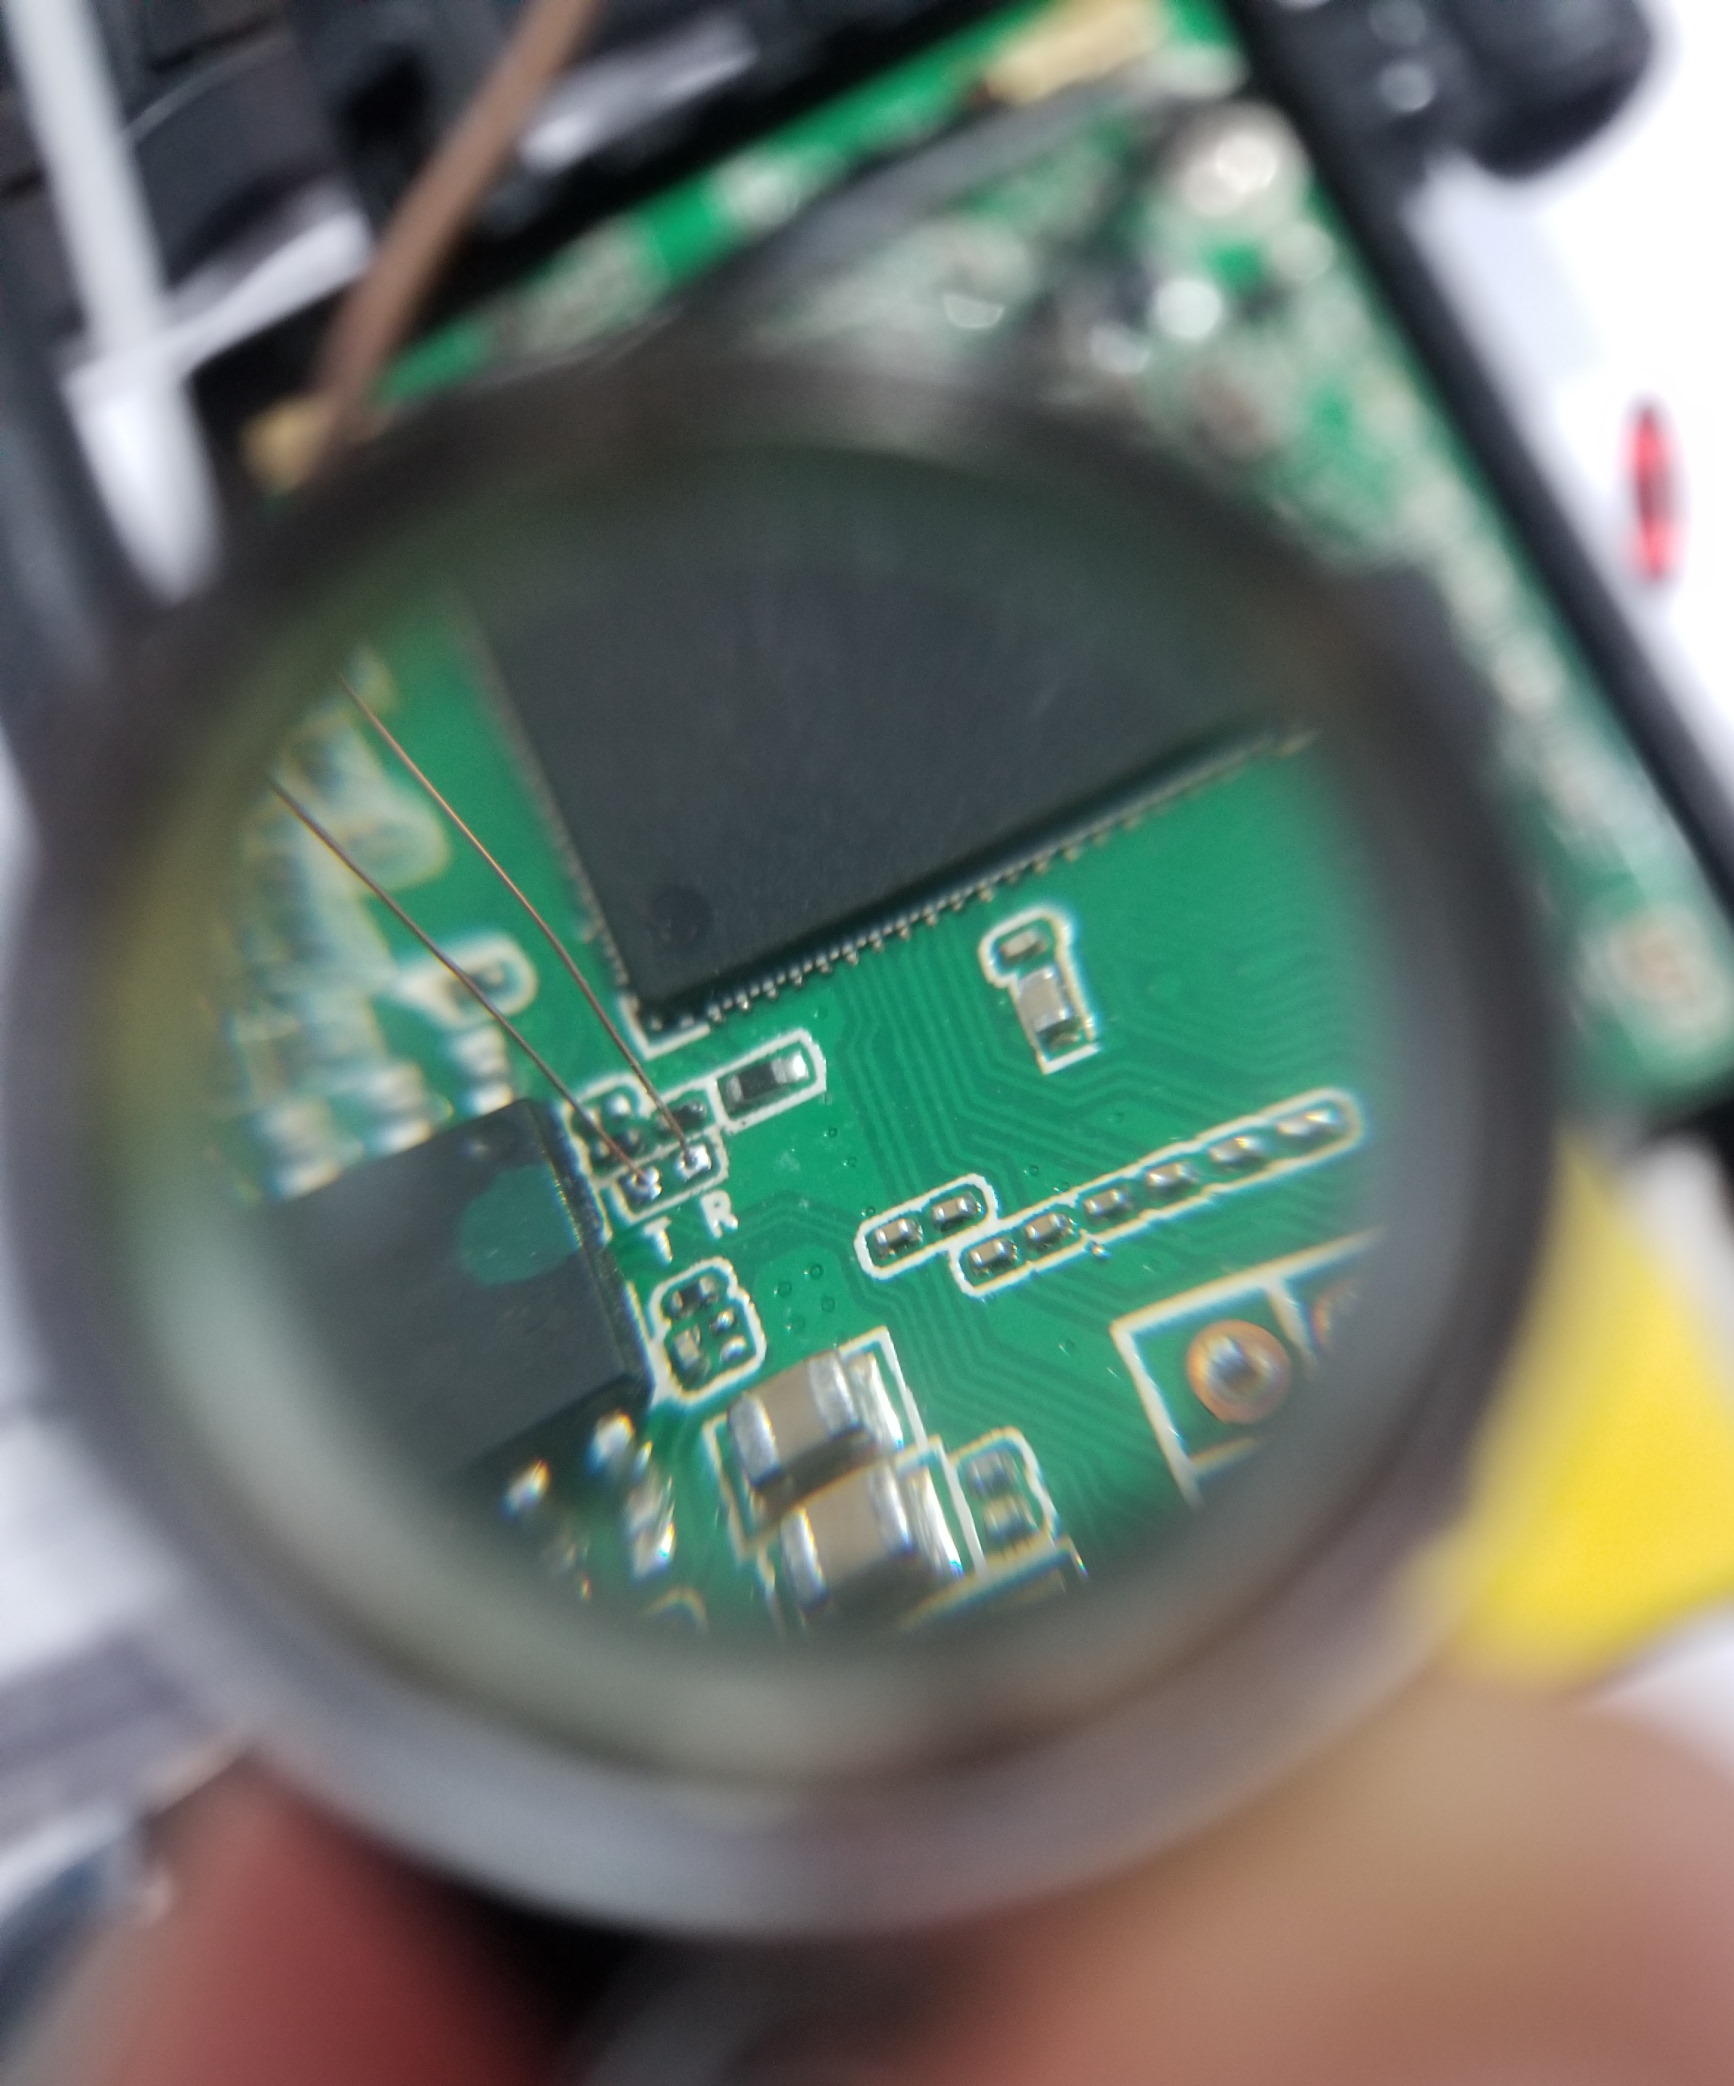
Cracking opening the cover (no screws, stiff snap joints), one sees a MediaTek MT7628AN networking SoC, a MT7612EN wifi chip, and a Zentel A3R12E40DBF DRAM chip. There are no large debugging pins, but the “T R” pads look promising for establishing serial communication with the chip. Since there are no helpful pads around these 2 pads labelled as ground, one additional task is to find a suitable ground pin. For that, the “G” pin looks promising.
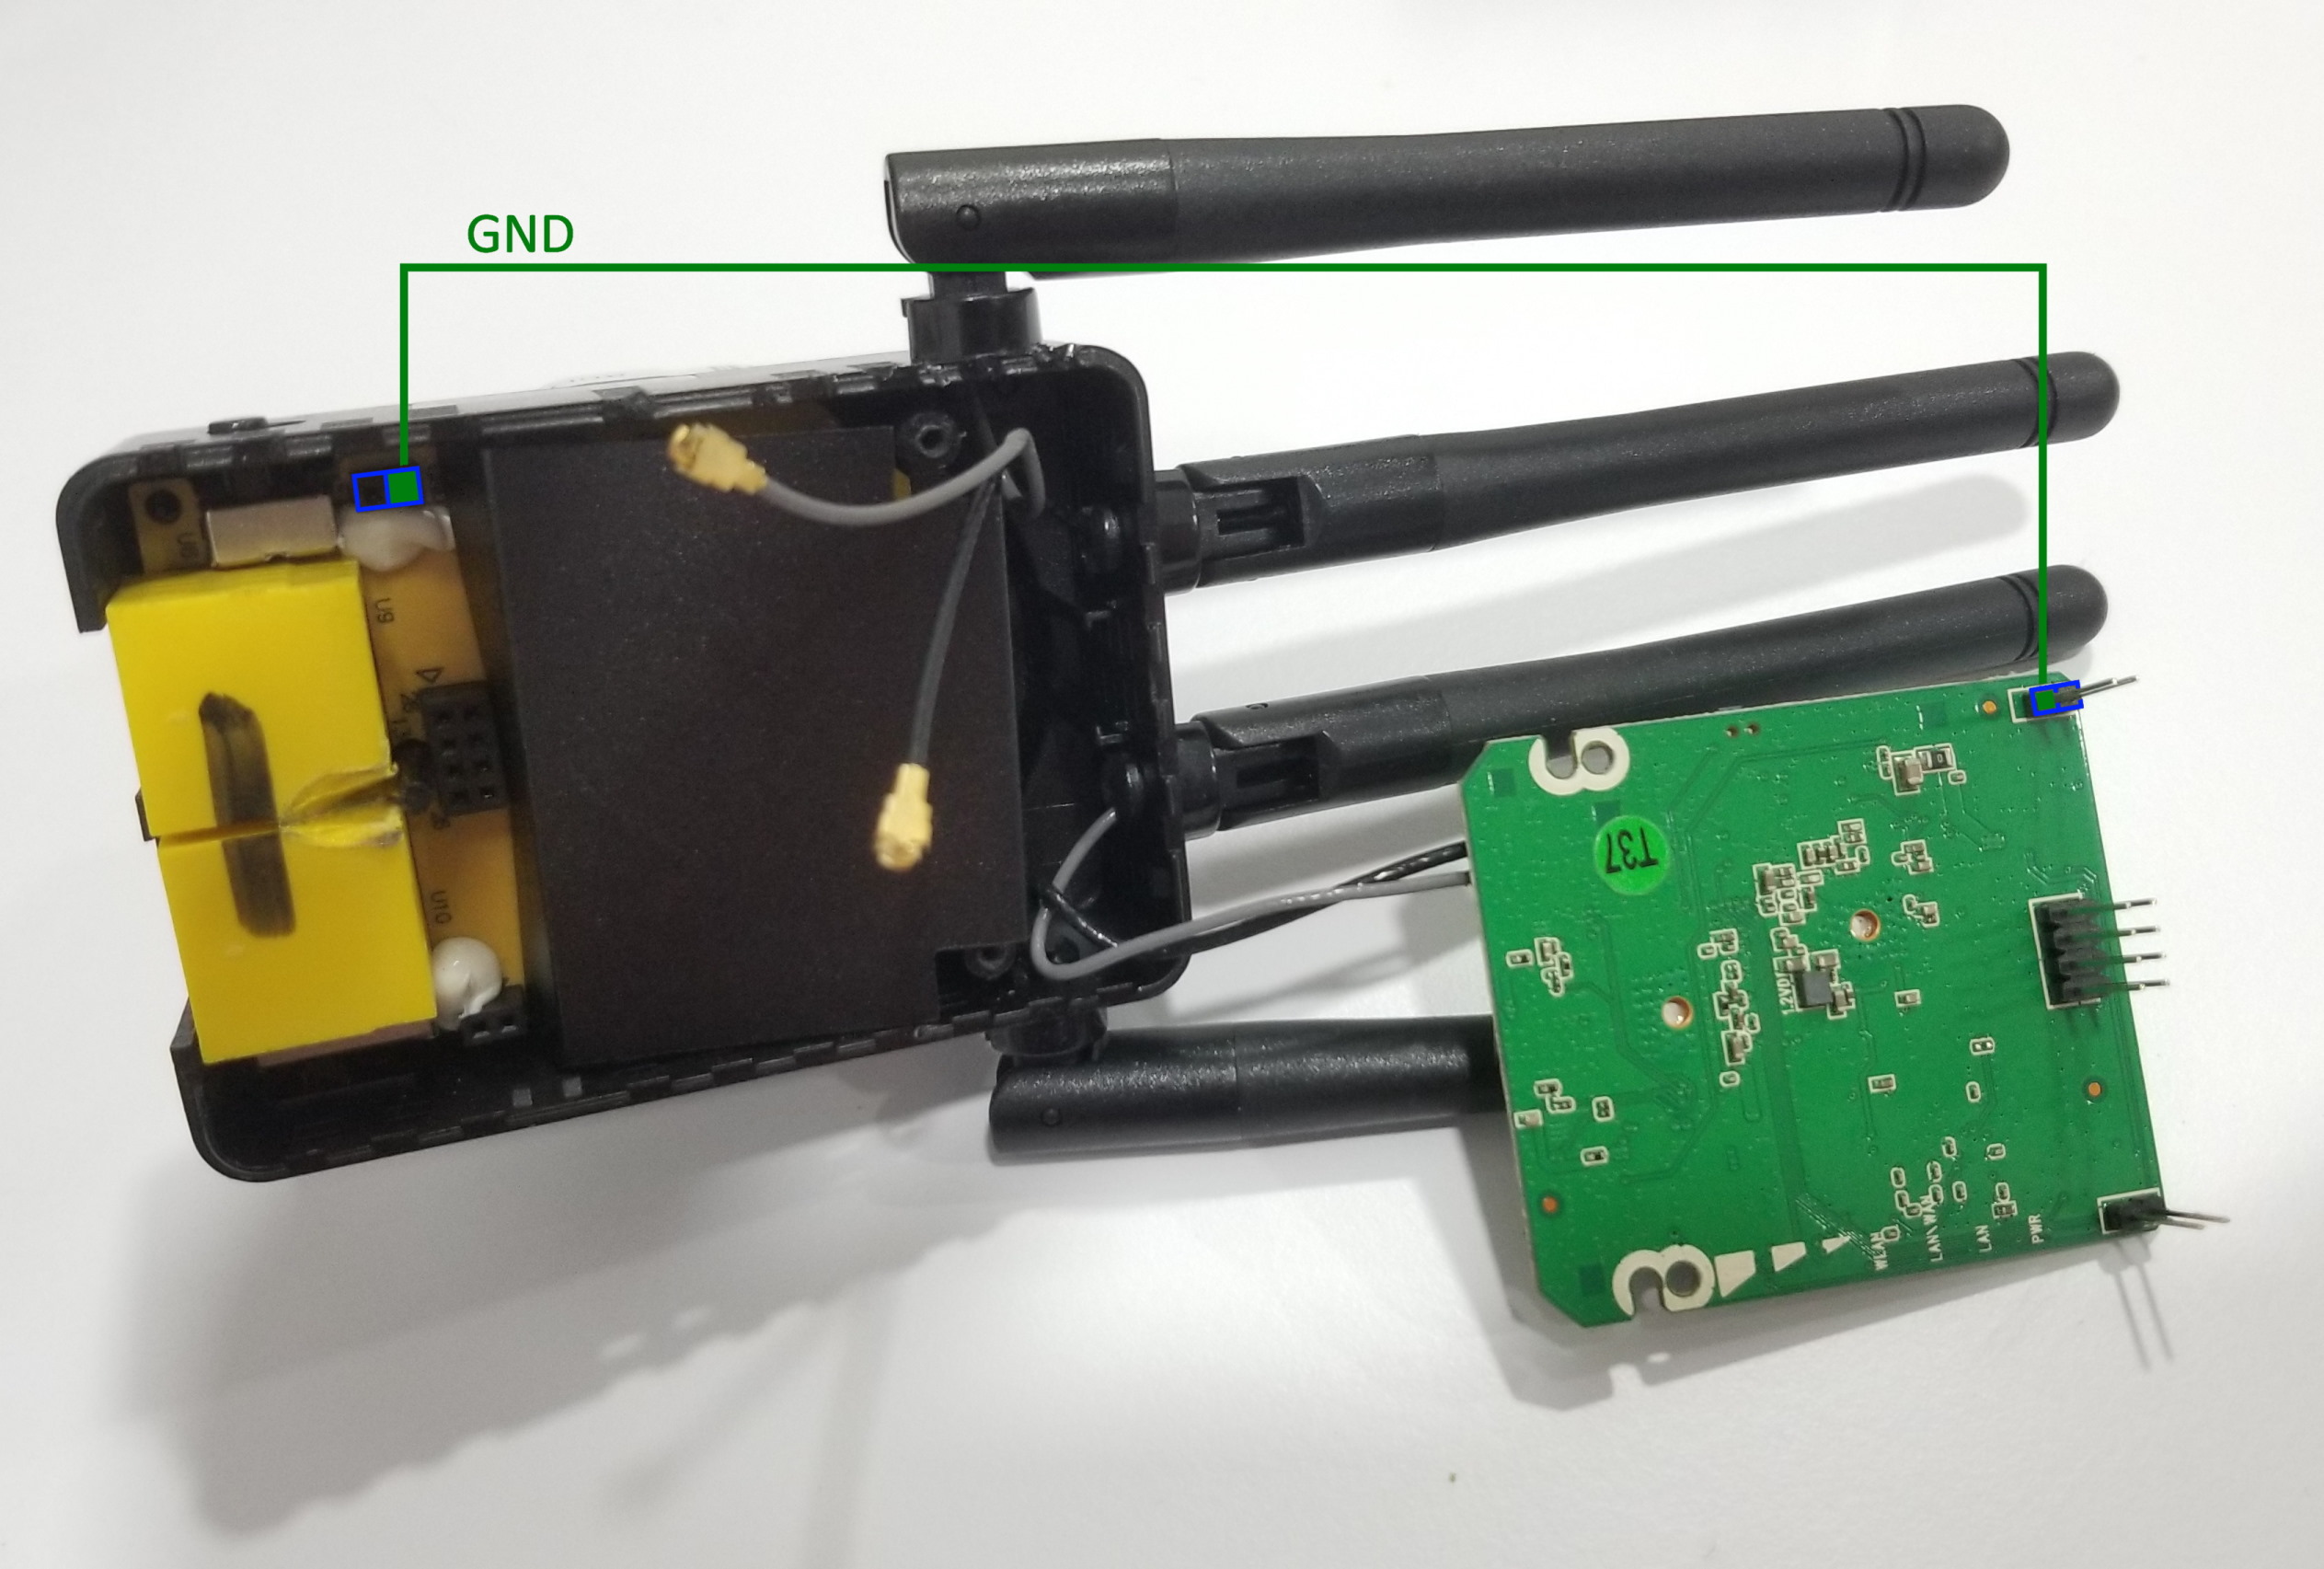
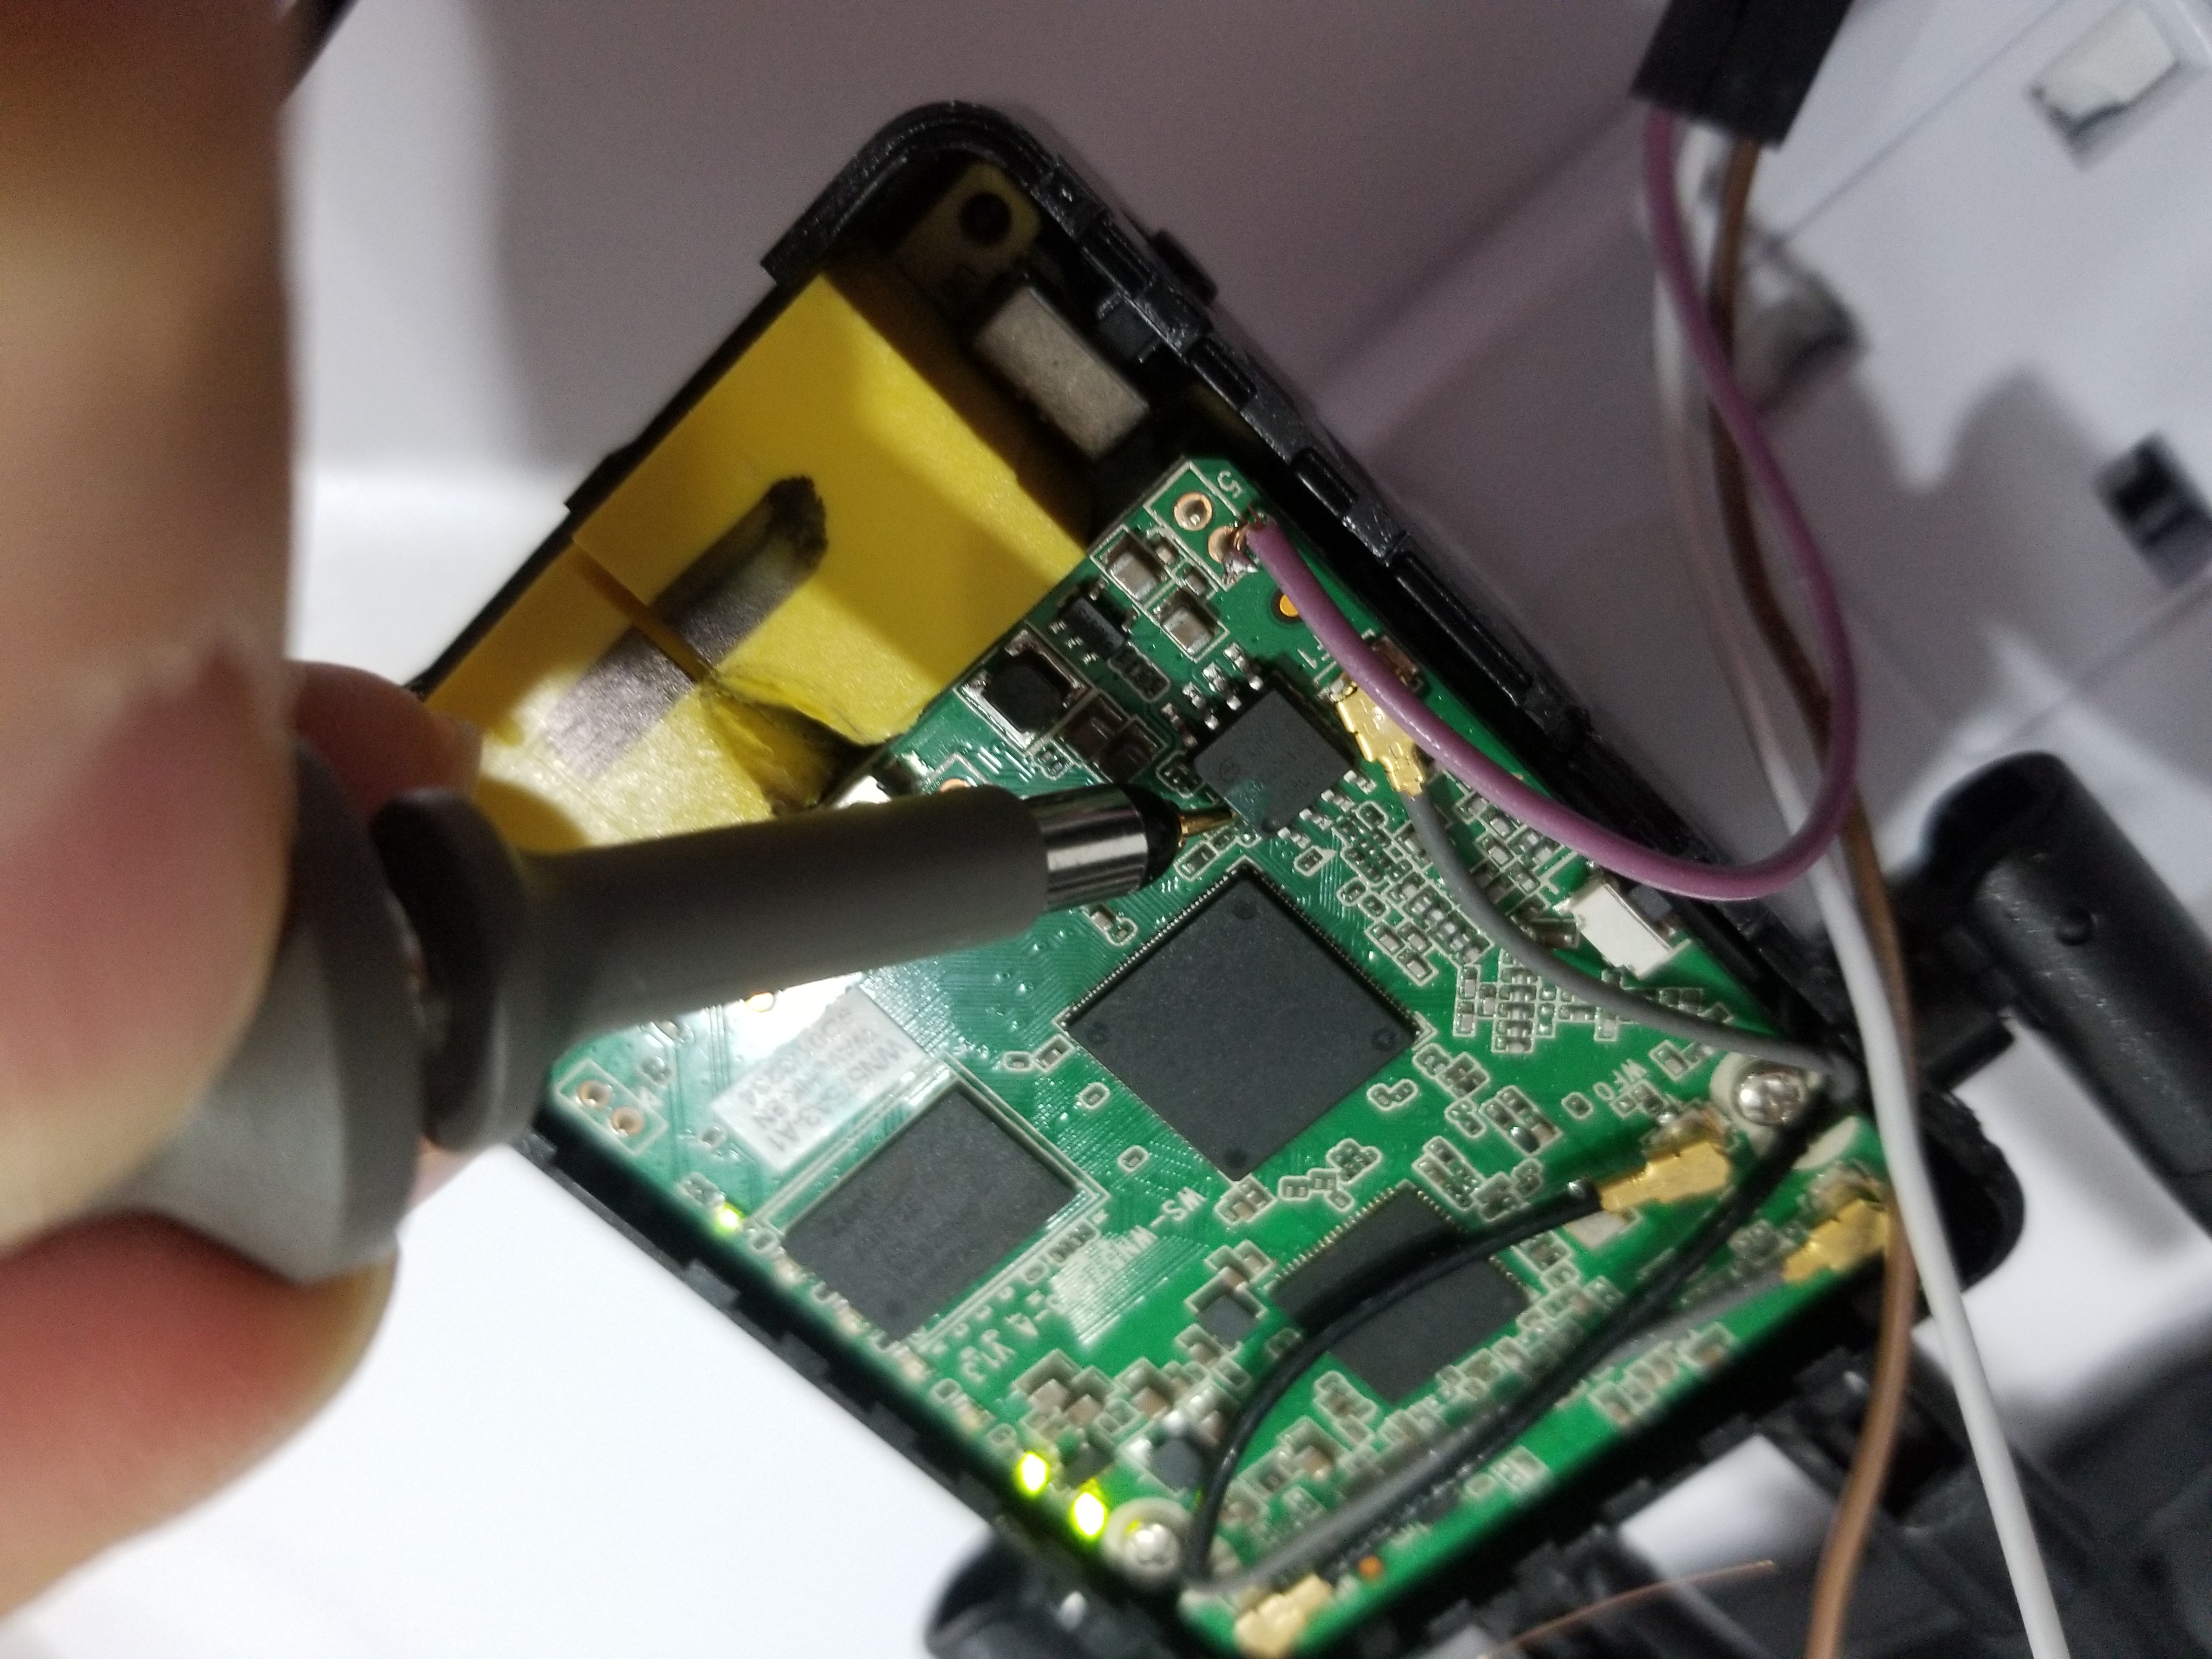
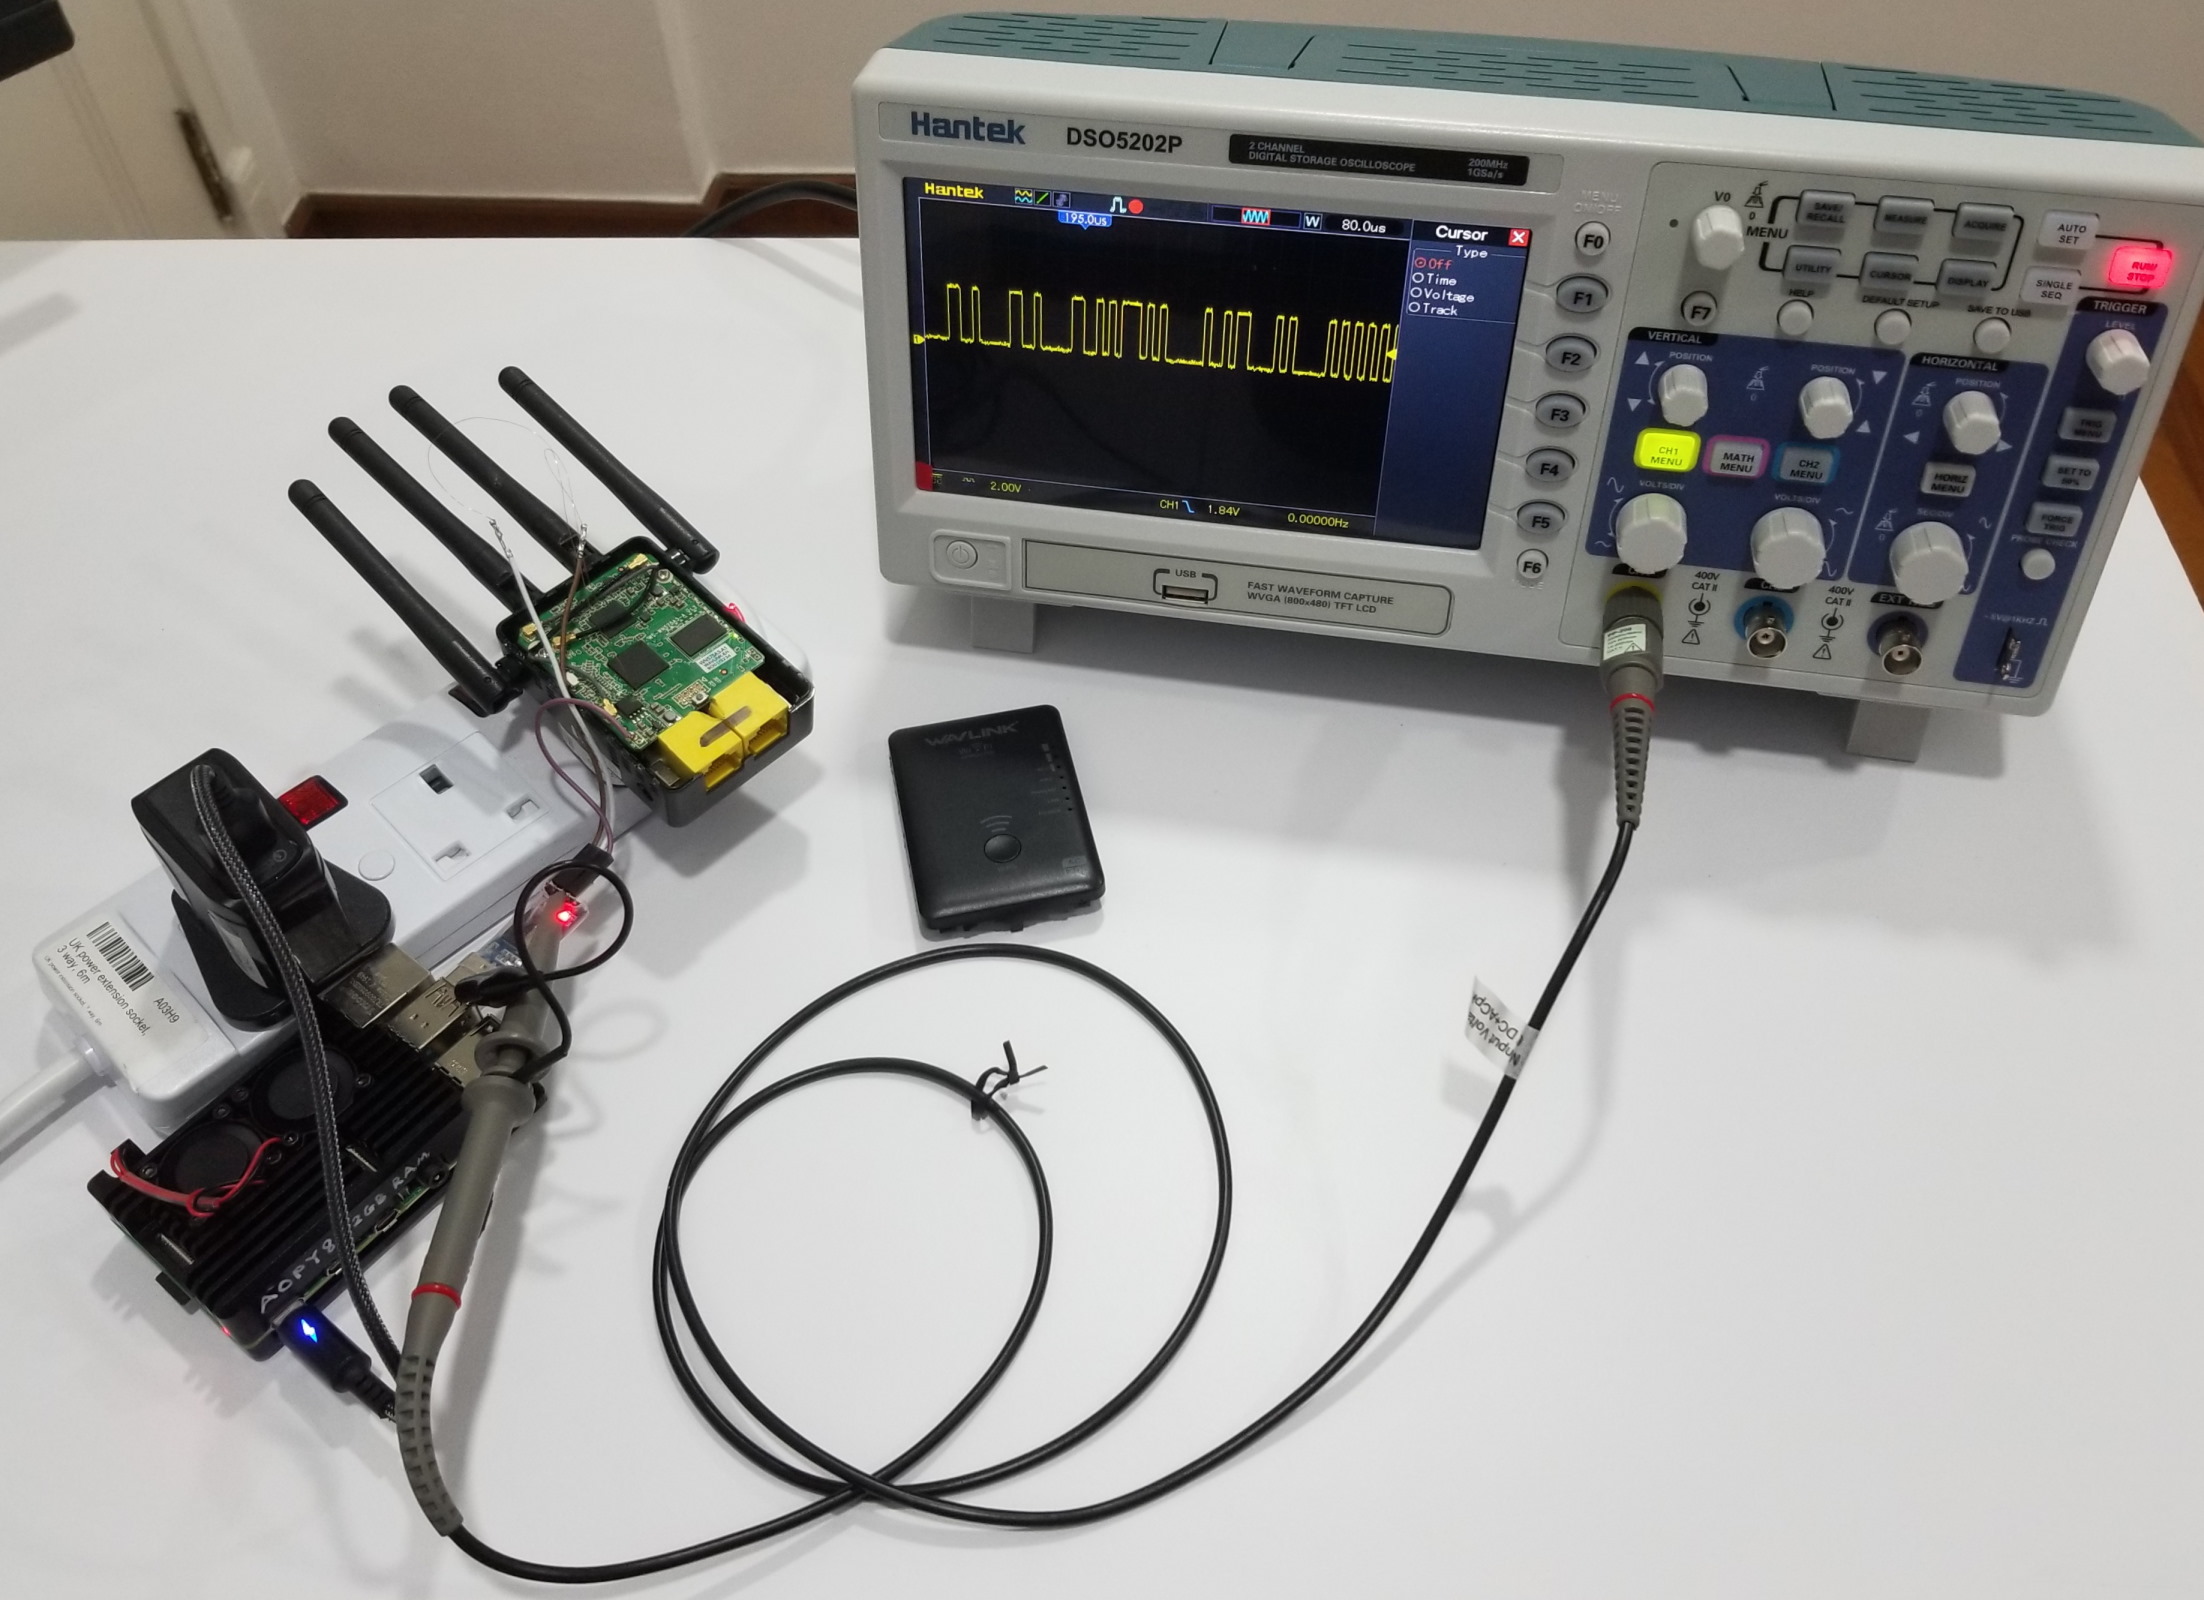
Taking the board further apart and reviewing the board traces, the “G” pin does look like it serves the ground PCB net. I soldered a connection out of the ground pin, and used an oscilloscope to check the signals out of the T and R pins while the wifi repeater was booting up. The wifi repeater is powered by mains voltage and probed while open, so the device was carefully inspected beforehand to understand where the mains voltage exists. Please do not copy blindly.
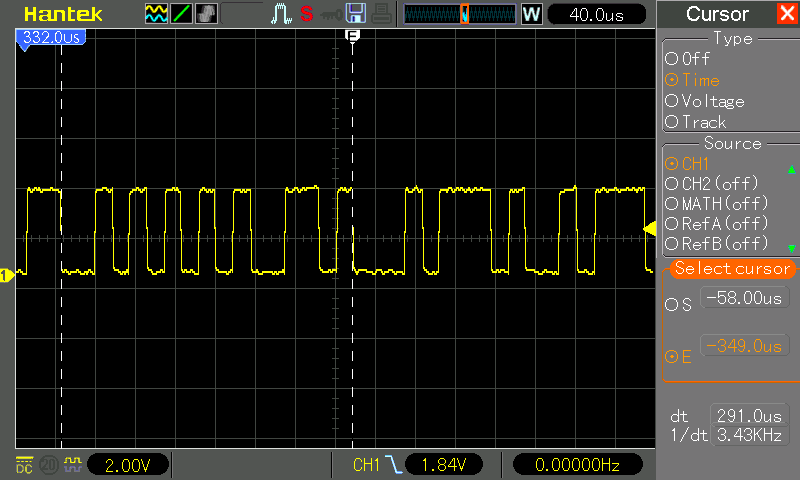
On the oscilloscope, the distinct traces of a serial communication is visible. With 17 bits spanning 291μs, this works out to a 58419bps serial line, or 57600bps for a more typical baud rate.
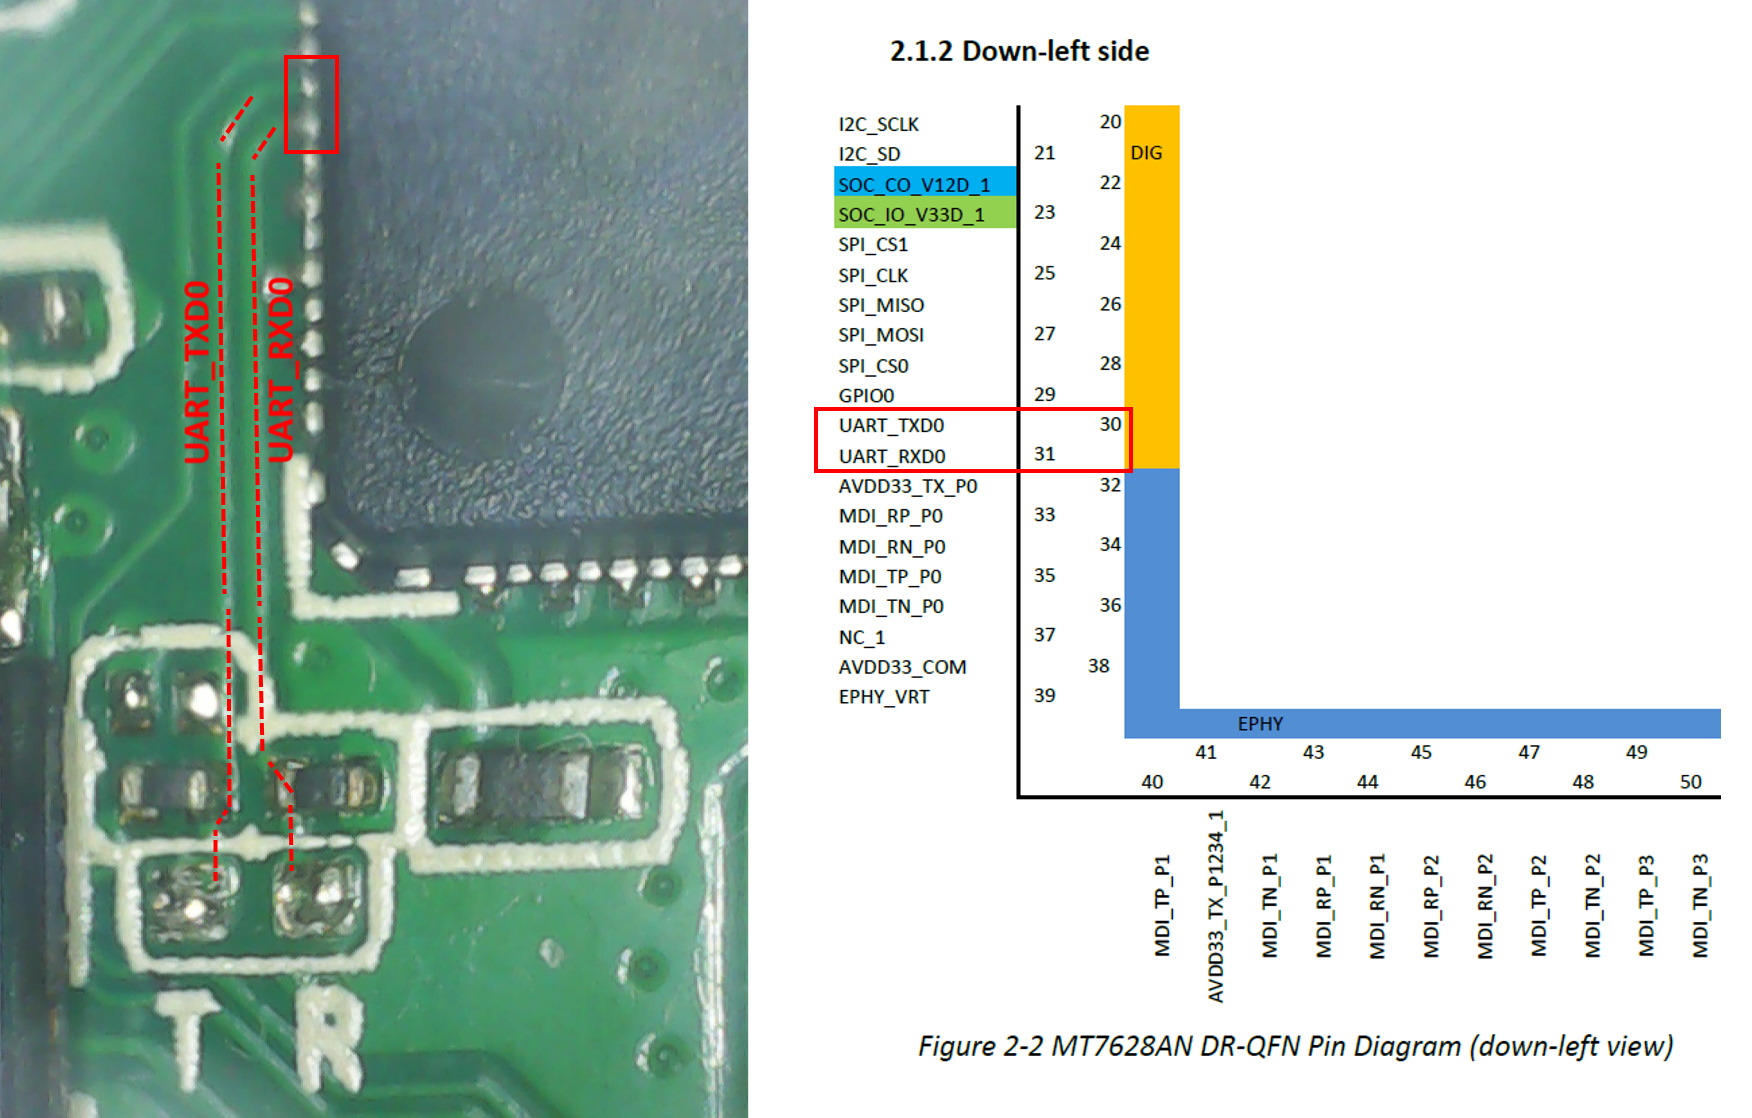
Checking the datasheet of the MediaTek MT7628AN chip, we can also confirm that the R and T pins are the serial (UART) pins. Now we have more confidence about the identity of the pins before making physical connections to it, or else we risk frying the electronics.
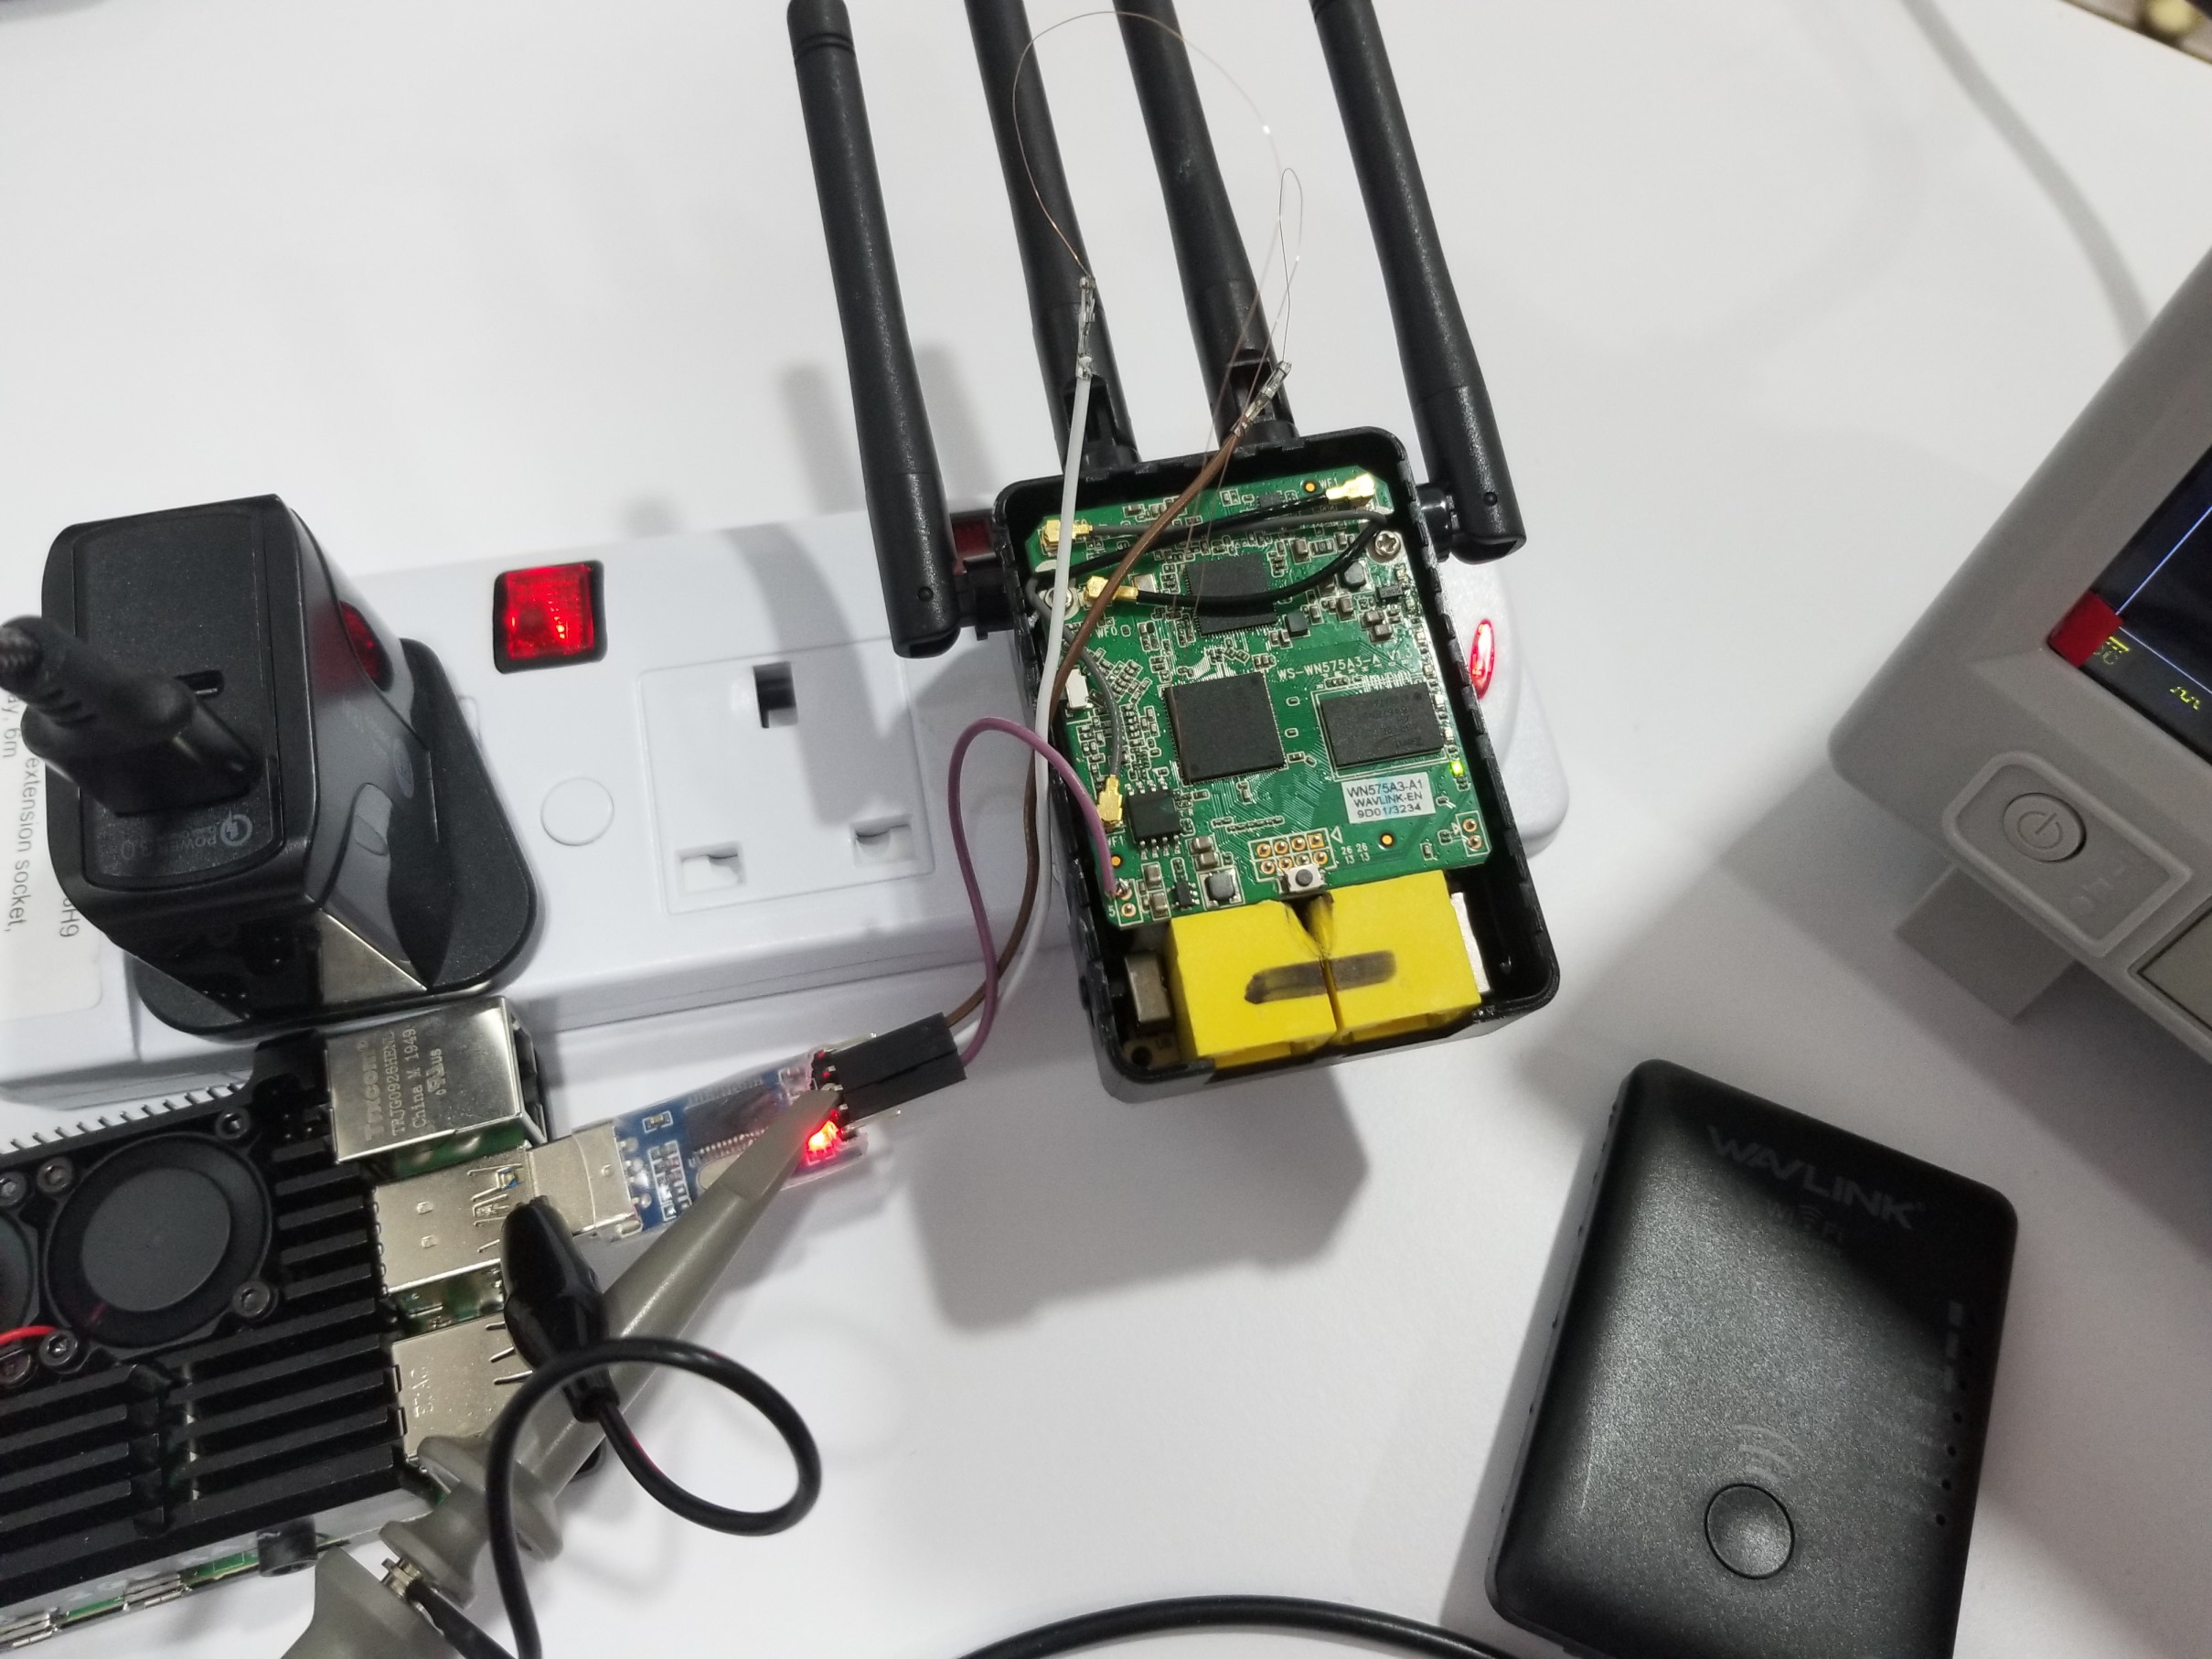
These R T pads are somewhat small, so thin enameled magnet wires (0.1mm diameter) were used for the solder connection to connect to them. The receive (RX/R), transmit (TX/T), ground (G) lines can then be connected to any USB-to-serial converter. Here, I used a PL2303 USB-to-TTL converter, a Raspberry Pi, and minicom running on the Raspberry Pi to establish serial communication with the Wavlink repeater.
When the minicom program is set to a more common 9600bps or 512000bps baud rate, there is only gibberish. Normally we can try all the different baud rates and wait for clear text to appear, but from the oscilloscope trace, we know that the baud rate is likely to be 57600bps. Setting that, minicom now shows the boot logs when the Wavlink device is powering up.

Poking around the interface by sending commands through minicom back to the Wavlink repeater (those commands goes from the Raspberry Pi through the PL2303 and down into the R pad), one finds a lighttpd www directory from which the manufacturer’s original administrative pages are served from.
RTMPDrvOpen(1):Check if PDMA is idle!
RTMPDrvOpen(2):Check if PDMA is idle!
br0: port 3(rai0) entering learning state
br0: port 3(rai0) entering learning state
br0: port 3(rai0) entering forwarding state
# ls
dev     etc     mnt     sbin    init    sys     proc    media
usr     lib     home    var     etc_ro  bin     tmp
# pwd
/
# cd /etc_ro/lighttpd/www
# ls
cgi-bin               lang2_ital.js         fileerror.shtml
live_mfg.shtml        live_internet.shtml   set_time.shtml
common.css            encodeToGb2312.js     set_safety.shtml
live_setLedOff.shtml  live_status.shtml     wizard_client.shtml
wifi_wavlink          upgradeok.shtml       wizard.shtml
wifi_rep.shtml        net_tool.shtml        live_disk.shtml
wwan.shtml            tftpd855.exe          jquery-1.8.2.min.js
main1.shtml           ledonoff.shtml        lang2_span.js
webcmd.shtml          common.js             images
wizard_rep.shtml      803F5D.txt            login1.shtml
login.shtml           live_speed.shtml      sitesurvey.shtml
webdav                live_signal.shtml     man_security.shtml
lang2_zhcn.js         lan.shtml             update.shtml
reset_reboot.shtml    wifi_advance2.shtml   reset.shtml
ecos2.js              net_dmz.shtml         net_virtual.shtml
login2.shtml          Templates             favicon.ico
main.shtml            lang2_japa.js         lang2_zhtw.js
setting.shtml         set_sitesurvey.shtml  live_repsignal.shtml
lang2_en.js           net_ddns.shtml        lang2_fran.js
wifi.shtml            devicestat.shtml      md5.js
wizard_wisp.shtml     wizard_ap.shtml       wifi_mode.shtml
wifi_base.shtml       nas_disk111.shtml     lang_germ.js
live_ddns.shtml       jquery.form.js        wan.shtml
live_check.shtml      wifi_advance5.shtml   live_setLedOn.shtml
live_setting.shtml    log.shtm              lang_conf.js
nas_disk.shtml        login_test.shtml      ecos.css
main2.shtml           sysinit.shtml
index.shtm            wizard_router.shtml
If the webcmd.shtml filename catches your eye, then you guessed it right. That page, accessible from http://192.168.10.1/webcmd.shtml, provides a convenient backdoor to execute commands as root. Typing id into the web interface generates the log line adm.c:main:2235:page=sysCMD&command=id&SystemCommandSubmit=Apply visible on the serial terminal, and the following response on the web console.
# id
uid=0(admin) gid=0(admin)
# pwd
/etc_ro/lighttpd/www
I am not sure I would trust a firmware with such an access. Searching CVEs related to Wavlink, one finds a long list of vulnerabilities [1,2]. That constitutes a larger reason to obliterate the original firmware and go with the ruggedised OpenWrt firmware. So much for Wavlink in touting that a “new generation of Wi-Fi security is coming”.
Carrying on with our objective to replace the firmware, we first have to replace the bootloader into one that can pull a firmware upgrade from a TFTP server. Fortunately, Connor McMillan has a great guide titled Rewriting an MT7628AN Bootloader, although I had to make some adaptations for my possibly security-upgraded device. McMillan used telnet at port 21. Although I see no open ports at 1 through 79, at least I have the physical serial access as a good substitute. I followed McMillan’s instructions to backup the original bootloader and create a new webpage at /etc_ro/lighttpd/www/upload.html with the below HTML code to accept a firmware upload.
<!-- /etc_ro/lighttpd/www/upload.html -->
<form method="post" action="cgi-bin/upload_bootloader.cgi"
  name="submit" enctype="multipart/form-data">
<input type="file" name="fileField"><br /><br />
<input type="submit" name="submit" value="Submit">
</form>
This newly created web page appears at http://192.168.10.1/upload.html as expected, but upon uploading the unlocked bootloader.bin file, alas, I have a HTTP 404 not found for upload_bootloader.cgi. It turns out upload_bootloader.cgi has been removed by the manufacturer on my device.
# cd cgi-bin
# ls
login.cgi            ExportSettings.sh    history.sh
upload.cgi           qos.cgi              History
adm.cgi              wireless.cgi         makeRequest.cgi
PatchList            firewall.cgi
upload_settings.cgi  internet.cgi
The “upload.cgi” was also found to not be a working substitute for the missing “upload_bootloader.cgi” because an attempt to upload the bootloader there will give a upload.c:main:304:Not a valid firmware. Bad Magic Number: "/var/tmpFW" is no valid image on the serial terminal. Searching around the internet, I end up at McMillan’s website again, this time helpfully providing the upload_bootloader.cgi required to replace the bootloader. This is a binary ELF file which has to be pushed to the device, but having a serial terminal and no SCP/FTP is not very helpful when trying to upload binary files. However, upload.cgi still has some worth, since it actually saves the uploaded file at /var/tmpFW before running the magic number check on the user-provided file (which then fails). Thus, to get the “upload_bootloader.cgi” to the device, I simply uploaded it as if it was a bootloader, then mv the file from /var/tmpFW to /etc_ro/lighttpd/www/cgi-bin/upload_bootloader.cgi. With that, the “upload.html” pointing to “upload_bootloader.cgi” now works perfect, and accepts the modified bootloader.bin.
With the modified bootloader, we can now retry the TFTP instruction. I opened a TFTP server using Tftpd64 and placed openwrt-21.02.1-ramips-mt76x8-wavlink_wl-wn575a3-squashfs-sysupgrade.bin as firmware.bin inside the TFTP root folder. However, after resetting the Wavlink while holding down the WPS button, no TFTP file transfer was observed. The Wavlink’s LAN LED continued indefinitely to flash very fast. Whipping out packet inspection tools, it was found that the Wavlink did indeed request a file through TFTP but Tftpd64 was buggy for me as it did not open port 69 to listen to incoming connections (as verified by netstat).
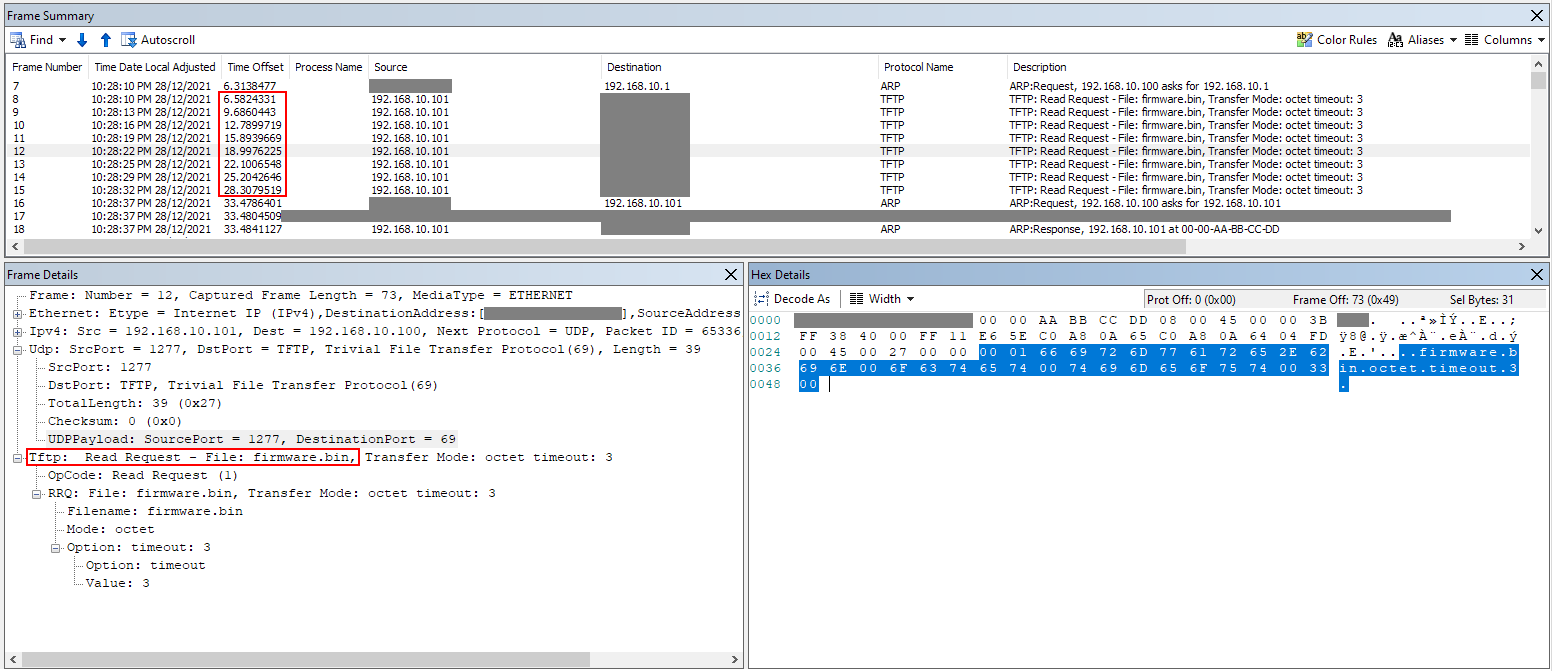
Changing the tool to haneWIN TFTP server, the file transfer now happens flawlessly. Observing the serial stream, I could see the file transfer succeeed, and then proceed to boot into OpenWrt.

Got ARP REQUEST, return our IP
TFTP from server 192.168.10.100; our IP address is 192.168.10.101
Filename 'firmware.bin'.

 TIMEOUT_COUNT=10,Load address: 0x82000000
Loading: * Got ARP REPLY, set server/gtwy eth addr (xx:xx:xx:xx:xx:xx)
Got it

TFTP error: 'File not found' (1)
Starting again

TFTP from server 192.168.10.100; our IP address is 192.168.10.101
Filename 'firmware.bin'.

 TIMEOUT_COUNT=10,Load address: 0x82000000
Loading: * Got ARP REPLY, set server/gtwy eth addr (xx:xx:xx:xx:xx:xx)
Got it
#################################################################
	 #################################################################
	 #################################################################
	 #################################################################
	 #################################################################
	 #################################################################
	 #################################################################
	 #################################################################
	 #################################################################
	 #################################################################
	 #################################################################
	 #################################################################
	 #################################################################
	 #################################################################
	 #################################################################
	 ##################################################
done
Bytes transferred = 5243204 (500144 hex)
LoadAddr=82000000 NetBootFileXferSize= 00500144
................................................................................
................................................................................
.
.
Done!
## Booting image at bc050000 ...
   Image Name:   MIPS OpenWrt Linux-5.4.154
   Image Type:   MIPS Linux Kernel Image (lzma compressed)
   Data Size:    1998731 Bytes =  1.9 MB
   Load Address: 80000000
   Entry Point:  80000000
   Verifying Checksum ... OK
   Uncompressing Kernel Image ... OK
No initrd
## Transferring control to Linux (at address 80000000) ...
Checking the web interface via a LAN connection, the pleasing OpenWrt GUI interface is up and running. The physical serial lines can now be removed and the device reassembled.
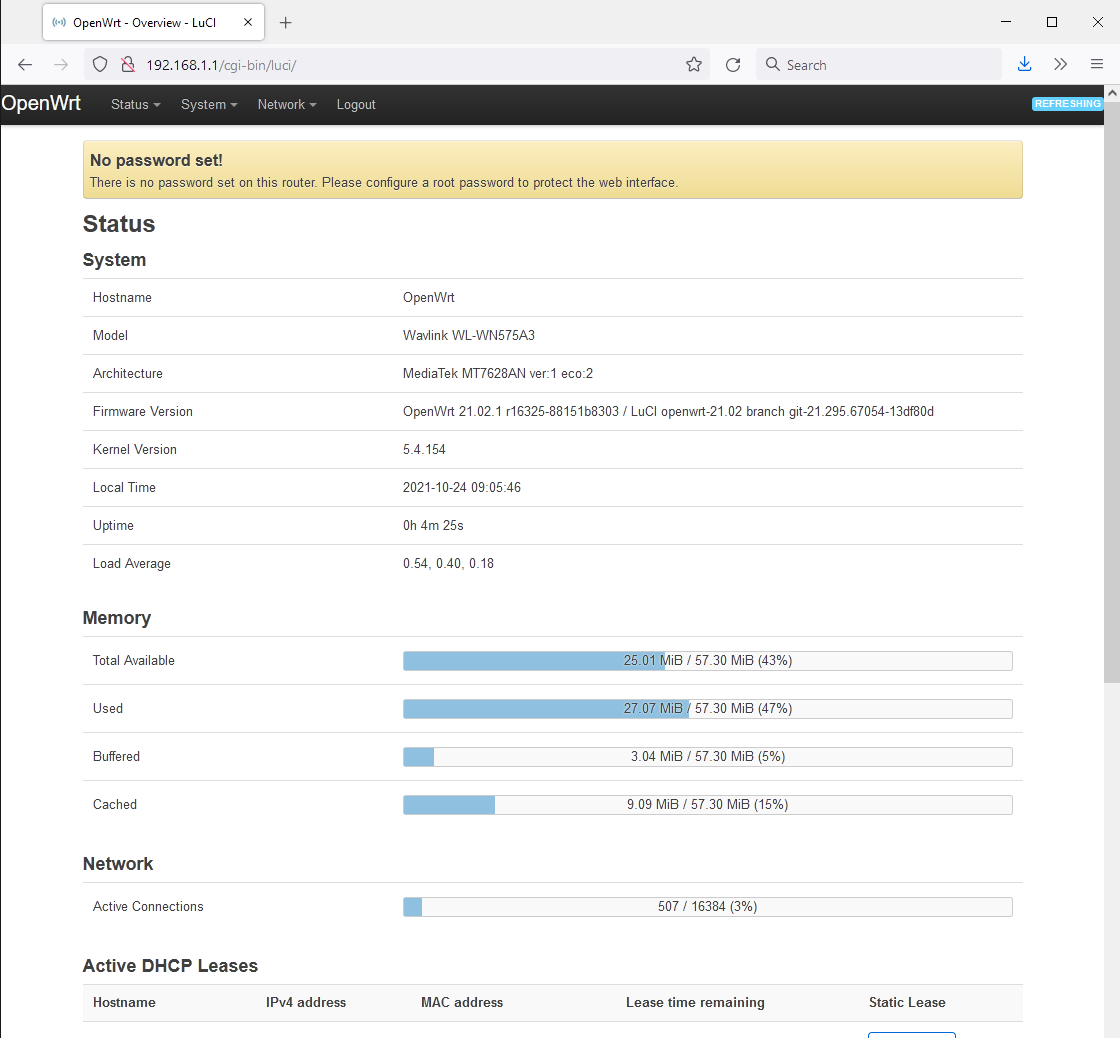
This demonstrates how debugging techniques can be used to diagnose and enhance an equipment, by cutting through security smokescreens and actually deploying robust open-source solutions that is not just securely sound, but with loads more features and customisability as well.
Update (3 Jan 2026): There are updated procedures to flash OpenWrt into newer versions of the WN575A3.
Resources
Zip of upload_bootloader.cgi, unblocked bootloader, and original bootloader.
With hindsight
- Port 2323 might have been the new port for telnet on the Wavlink WL-WN575A3 as suggested by the OpenWrt wiki.
- The wiki said that the serial is 57600bps.
- Maybe my bootloader might have been unlocked all along since I was testing with a faulty TFTP tool at the start.
- Telnet not available? Perhaps you can just use
webcmd.shtmlto start the telnet daemon.